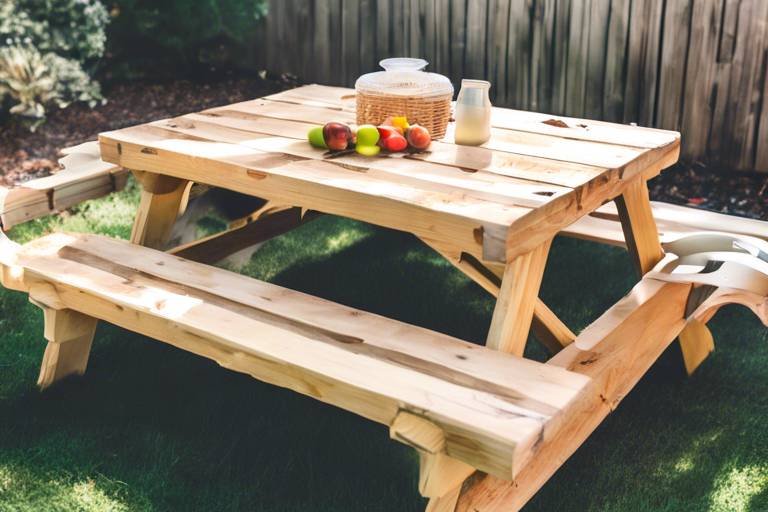
How to Create a DIY Outdoor Picnic Table
Are you looking to enhance your outdoor space with a touch of charm and functionality? Building your own DIY outdoor picnic table can be a rewarding and enjoyable project that adds character to your backyard or patio. Whether you're hosting a summer barbecue or simply enjoying a peaceful meal outdoors, a picnic table is a versatile piece of furniture that brings people together. Let's dive into the step-by-step process of creating your very own outdoor picnic table!

Gathering Materials and Tools
When embarking on your DIY outdoor picnic table project, gathering the right materials and tools is crucial for a successful build. You'll need to ensure you have everything at hand before starting to avoid interruptions and delays in the construction process.
First and foremost, you will need to gather the necessary materials for building your picnic table. This typically includes wood for the tabletop, benches, legs, and supports. Opt for a durable and weather-resistant wood type such as cedar or pressure-treated pine to ensure longevity.
Additionally, you'll require fasteners such as screws, nails, or bolts to assemble the various components of the table securely. Make sure to choose the appropriate size and type of fasteners based on the thickness of the wood you are using.
Having the right tools on hand is equally important. Essential tools for this project may include a measuring tape for accurate dimensions, a saw for cutting the wood to size, a drill for making holes and attaching components, and a sander for smoothing out rough edges.
Furthermore, consider using protective gear such as safety goggles, gloves, and a dust mask to ensure your safety while working with wood and power tools. Prioritize safety to prevent any accidents or injuries during the construction process.
By gathering the right materials and tools in advance, you set yourself up for a smooth and efficient building experience, allowing you to focus on the creative and rewarding aspects of constructing your very own outdoor picnic table.

Measuring and Cutting Wood
When it comes to creating a DIY outdoor picnic table, one of the crucial steps is measuring and cutting the wood. This process sets the foundation for the entire project, ensuring that each piece fits together seamlessly like a well-crafted puzzle. Before you dive into cutting, it's essential to have a clear plan and understanding of the measurements required for your picnic table.
Start by gathering all the necessary wood materials, such as planks for the tabletop, benches, legs, and supports. Remember, precision is key in this step to avoid any misalignments or uneven surfaces. Measure twice, cut once - a timeless mantra that holds true in woodworking. Use a reliable measuring tape and a pencil to mark the dimensions accurately on the wood.
Once you have your measurements marked, it's time to bring out the saw. Whether you're using a circular saw, miter saw, or handsaw, ensure that the blade is sharp for clean cuts. Take your time and follow the markings closely to maintain accuracy. Remember, it's better to cut a bit longer than shorter, as you can always trim excess wood later.
When cutting the wood, pay attention to the grain direction to prevent splintering or rough edges. A smooth, clean cut not only enhances the aesthetics of your picnic table but also ensures a sturdy construction. Additionally, consider using a cutting guide or clamps to keep the wood steady and secure during the cutting process.
After cutting all the necessary pieces to size, double-check the dimensions to confirm their accuracy. It's normal to have slight variations, but strive for consistency to maintain a uniform look for your picnic table. Once you are satisfied with the cuts, proceed to sand the edges lightly to remove any roughness and splinters.
Remember, the success of your DIY picnic table project hinges on precise measurements and accurate cuts. Embrace the process of measuring and cutting wood as the building blocks of your creation, setting the stage for a beautiful and functional outdoor dining experience.

Assembling the Table Frame
Assembling the table frame is a crucial step in creating a sturdy and durable picnic table that will withstand outdoor elements and provide a reliable surface for dining and socializing. To begin this process, you will need to lay out all the necessary pieces of wood for the frame, including the legs, supports, and braces. Ensuring that each component is properly cut to the correct dimensions is essential for a seamless assembly.
One effective technique for assembling the table frame is to work methodically, starting with attaching the legs to the tabletop frame. Secure each leg firmly in place using appropriate screws or bolts, ensuring they are level and properly aligned to support the weight of the table. Next, attach the supports and braces to reinforce the structure and prevent wobbling or instability.
Consider using a table clamp or a helping hand to hold the pieces in position while you secure them together, ensuring a tight and secure fit. Double-check all connections and fasteners to guarantee the frame is structurally sound before moving on to the next step of adding the tabletop and benches.
Remember, the quality of your table frame's assembly will directly impact the overall stability and longevity of your picnic table. Taking the time to assemble the frame correctly will result in a reliable and robust outdoor furniture piece that you can enjoy for years to come.

Adding the Tabletop and Benches
Learn how to build your own outdoor picnic table with these step-by-step instructions and tips for a fun and functional addition to your backyard or patio.
Discover the essential materials and tools needed to start your DIY outdoor picnic table project, ensuring you have everything required for a successful build.
Learn the proper techniques for measuring and cutting wood to the correct dimensions for your picnic table, ensuring precision and accuracy in your construction.
Follow detailed instructions on assembling the frame of your picnic table, including securing the legs, supports, and braces for a sturdy and durable structure.
When adding the tabletop and benches to your picnic table, it's crucial to ensure a secure and stable attachment. The tabletop should be centered and aligned properly with the frame, allowing for overhang if desired. Use strong screws or bolts to fix the tabletop to the frame, ensuring it can withstand the weight of dishes and activities. For the benches, position them evenly on each side of the table, ensuring they are at a comfortable height for seating. Attach the benches securely to the frame, allowing enough legroom for individuals to sit comfortably.
Discover the importance of sanding your picnic table to achieve a smooth surface, as well as applying finishes or stains to protect the wood and enhance its appearance.
Get creative with ideas for personalizing your DIY picnic table, such as painting designs, adding umbrella holes, or incorporating built-in coolers for added convenience.
Learn how to properly care for and maintain your outdoor picnic table to ensure its longevity and beauty, including tips on cleaning, sealing, and protecting it from the elements.
Once your outdoor picnic table is complete, gather your friends and family to enjoy meals, games, and quality time together in the comfort of your own backyard.
Coming soon...

Sanding and Finishing Touches
Learn how to build your own outdoor picnic table with these step-by-step instructions and tips for a fun and functional addition to your backyard or patio.
When it comes to adding the finishing touches to your DIY outdoor picnic table, sanding plays a crucial role in achieving a smooth and polished surface. Before applying any finishes or stains, it's essential to ensure that the wood is properly sanded to remove any rough edges or imperfections. Think of sanding as the final touch that brings out the natural beauty of the wood, making your picnic table not only functional but also visually appealing.
Additionally, choosing the right finish for your picnic table is key to protecting the wood from the outdoor elements and enhancing its overall look. Whether you opt for a clear sealant to maintain the natural color of the wood or a vibrant stain to add a pop of color, the finishing touches you apply will not only provide protection but also give your picnic table a personalized touch.
Consider creating a table that outlines the different types of finishes available, their pros and cons, and the recommended maintenance for each option:
| Finish Type | Pros | Cons | Maintenance |
|---|---|---|---|
| Clear Sealant | Preserves natural wood color | May require more frequent reapplication | Reapply every 1-2 years |
| Stain | Adds color and protection | May hide natural wood grain | Reapply every 2-3 years |
| Paint | Unlimited color options | May chip or peel over time | Touch up as needed |
Remember, the finishing touches you choose for your picnic table should not only complement your outdoor space but also provide long-lasting protection against wear and tear. By taking the time to sand and finish your DIY creation, you'll ensure that your outdoor picnic table remains a durable and beautiful centerpiece for years to come.
Have questions about building and maintaining your outdoor picnic table? Check out these commonly asked questions for expert tips and advice:
- How often should I reapply finish to my picnic table?
- What is the best way to clean and protect my picnic table?
- Can I customize my picnic table with additional features?
- How can I prevent my picnic table from weather damage?

Personalizing Your Picnic Table
When it comes to personalizing your DIY picnic table, the possibilities are endless. One popular option is to paint creative designs on the tabletop and benches, adding a touch of personality to your outdoor space. Whether you prefer a classic checkered pattern or a vibrant floral motif, painting can transform your picnic table into a work of art.
Another fun idea for personalization is to add umbrella holes to provide shade on sunny days. This simple yet practical addition allows you to enjoy your outdoor meals comfortably, protected from the harsh rays of the sun. You can easily insert a patio umbrella into the hole to create a shady oasis for dining al fresco.
If you're looking to take your picnic table to the next level, consider incorporating built-in coolers for added convenience. These built-in compartments can keep your beverages and snacks chilled during outdoor gatherings, eliminating the need for separate coolers or ice chests. Your guests will surely appreciate the thoughtful touch of having refreshments within arm's reach.
For a more rustic or natural look, you can stain or seal the wood of your picnic table to enhance its durability and appearance. Stains come in a variety of colors and finishes, allowing you to customize the look of your table while protecting it from the elements. Sealing the wood also helps prevent moisture damage and prolongs the lifespan of your outdoor furniture.
Additionally, consider engraving or carving special messages or designs into the wood to create a personalized touch. Whether it's a family name, a meaningful quote, or a whimsical image, these custom details can make your picnic table truly one-of-a-kind. You can use a wood burner or carving tools to add intricate designs that reflect your style and creativity.
Don't forget about accessorizing your picnic table with decorative elements such as tablecloths, placemats, or centerpieces. These small touches can elevate the look of your outdoor dining area and create a welcoming atmosphere for your guests. Experiment with different accessories to find the perfect combination that suits your taste and complements the overall design of your picnic table.
By personalizing your DIY picnic table, you can create a unique and inviting outdoor space that reflects your personality and style. Whether you choose to paint, add accessories, or customize the wood, the options for customization are endless. Let your creativity shine through as you transform your ordinary picnic table into a standout piece that enhances your outdoor living experience.

Maintaining Your Picnic Table
Proper maintenance is key to ensuring the longevity and beauty of your outdoor picnic table. By following a few simple steps, you can keep your DIY creation looking its best for years to come.
First and foremost, regular cleaning is essential to prevent dirt, debris, and stains from accumulating on your picnic table. Simply wiping it down with a damp cloth or gentle soap and water solution can help maintain its appearance and cleanliness.
Additionally, sealing your picnic table with a weather-resistant sealant is crucial to protect it from the elements. This will help prevent warping, cracking, and discoloration caused by exposure to sunlight, rain, and humidity.
Inspect your picnic table periodically for any signs of wear or damage. Look for loose screws, splintered wood, or any other issues that may need repair. Addressing these issues promptly can prevent further damage and extend the lifespan of your table.
During the winter months or when not in use, consider covering your picnic table with a protective tarp or storing it indoors to shield it from harsh weather conditions. This extra step can significantly prolong the life of your outdoor furniture.
When it comes to maintaining the aesthetic appeal of your picnic table, consider refinishing or restaining it every few years. This will not only refresh its appearance but also provide added protection against wear and tear.
Remember, a well-maintained picnic table not only enhances the look of your outdoor space but also ensures a comfortable and enjoyable dining experience for you and your guests. By investing time and effort into proper maintenance, you can enjoy your DIY creation for years to come.

Enjoying Your DIY Creation
After all the hard work and dedication you've put into building your DIY outdoor picnic table, it's time to sit back, relax, and enjoy the fruits of your labor. Picture this: a warm summer day, a gentle breeze rustling through the leaves, and the smell of delicious food wafting from your very own picnic table. It's a scene straight out of a dream, but now, it's your reality.
As you gather around your newly crafted picnic table with your loved ones, the sense of accomplishment is palpable. The sturdy frame, the smooth tabletop, and the comfortable benches all come together to create the perfect setting for unforgettable moments. Whether you're sharing a meal, playing board games, or simply basking in the sun, your DIY creation provides the ideal space for bonding and relaxation.
Imagine the laughter, the stories, and the shared experiences that will unfold around your picnic table. It's not just a piece of furniture; it's a centerpiece for joy and connection. Every detail, from the carefully measured wood to the personalized touches, reflects your hard work and creativity. Your picnic table is more than just a place to eat; it's a symbol of your dedication and craftsmanship.
So, grab a seat at your outdoor oasis, raise a toast to your DIY prowess, and savor the satisfaction of a job well done. Your picnic table isn't just a piece of furniture; it's a testament to your skills, your passion, and your ability to turn a simple project into a cherished memory. Enjoy every moment spent at your DIY creation, and let it serve as a reminder of what you can achieve with a little imagination and a lot of determination.
Frequently Asked Questions
- Can I build a picnic table without any prior woodworking experience?
Yes, building a DIY outdoor picnic table is a project that can be tackled by beginners with the right guidance and tools. Following step-by-step instructions and taking your time to measure and cut accurately will help you achieve a successful build.
- What type of wood is best for constructing an outdoor picnic table?
Choosing a durable and weather-resistant wood such as cedar, redwood, or pressure-treated pine is ideal for building an outdoor picnic table. These woods can withstand outdoor elements and provide longevity to your project.
- Do I need specialized tools to build a picnic table?
While having access to tools like a saw, drill, measuring tape, and screwdriver will make the construction process easier, you can often rent or borrow these tools if you don't own them. Basic woodworking tools are sufficient for completing a DIY picnic table project.
- How can I protect my picnic table from the elements?
Applying a weather-resistant finish or sealant to your picnic table can help protect it from rain, sun exposure, and other outdoor conditions. Regularly maintaining and reapplying finishes as needed will ensure the longevity and beauty of your outdoor furniture.
- Is it possible to customize my picnic table design?
Absolutely! Personalizing your DIY picnic table with unique paint colors, designs, or additional features such as umbrella holes or built-in coolers can add a touch of creativity and functionality to your outdoor space. Let your imagination run wild!