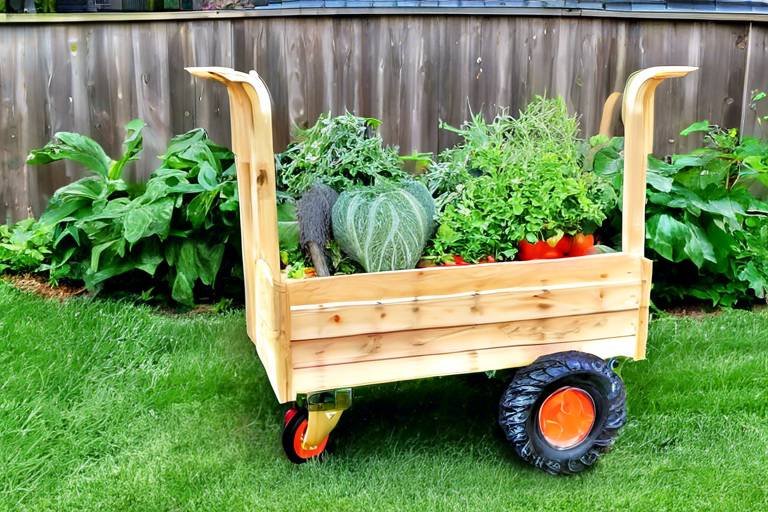
How to Build a DIY Garden Cart for Easy Harvesting
Are you tired of struggling with heavy baskets and buckets while harvesting your garden produce? Do you wish there was an easier way to transport your fruits and vegetables from the garden to your kitchen? Well, look no further because we have the perfect solution for you - a DIY garden cart! Imagine the convenience of having a customized cart that glides effortlessly through your garden, carrying all your harvest with ease. Not only will it make your harvesting tasks more efficient, but it will also add a touch of creativity to your gardening experience.

Materials Needed
When embarking on the journey of creating your very own DIY garden cart, it is crucial to gather all the necessary materials before diving into the construction process. The key materials needed for this project include high-quality wood, durable wheels, sturdy screws, and a reliable drill. These components will form the foundation of your garden cart, ensuring its longevity and functionality.
Before you start assembling the garden cart, make sure you have all the essential tools and equipment at hand. Having the right tools, such as a measuring tape, saw, and screwdriver, will streamline the construction process and help you achieve professional results. Proper preparation and organization will set the stage for a successful DIY project.
Wood is a fundamental material for constructing the frame and cart bed of your garden cart. Opt for hardwood varieties like oak or cedar for durability and resilience against outdoor elements. The choice of wood will impact the overall strength and aesthetic appeal of your garden cart, so select high-quality lumber that suits your preferences.
When selecting wheels for your garden cart, prioritize durability and smooth movement. Choose wheels that are suitable for various terrains to ensure effortless maneuverability in your garden. Additionally, consider the size and weight capacity of the wheels to support the cart's structure and accommodate the harvested produce.
Securing the components of your garden cart with reliable screws is essential for stability and structural integrity. Invest in high-quality screws that are suitable for outdoor use and can withstand the weight and pressure exerted on the cart during harvesting activities. Proper fastening will ensure that your garden cart remains sturdy and functional over time.

Design Planning
When it comes to designing your DIY garden cart, meticulous planning is key to ensuring that the final product meets your specific needs and fits seamlessly into your gardening routine. Imagine yourself as an architect envisioning a new skyscraper, except in this case, you're designing a practical and efficient cart to aid you in your harvesting endeavors. Before diving into the construction phase, take the time to carefully map out the size, shape, and features of your garden cart.
Consider the layout of your garden and the type of produce you typically harvest. Do you need a larger cart to transport hefty pumpkins and watermelons, or a smaller one for delicate herbs and flowers? Think about the pathways in your garden and how maneuverable the cart needs to be. Just like a chess player strategizing their next move, plan out the design of your cart to optimize functionality and convenience.
Sketching out a blueprint can serve as your guiding light throughout the construction process. It's like drawing a treasure map leading you to a bountiful harvest at the end of the gardening season. Visualize where the wheels will go, how spacious the cart bed should be, and where the handles will be positioned for easy pushing and pulling. This preliminary design stage sets the foundation for a successful and tailored garden cart that will streamline your harvesting tasks.

Building the Frame
Building the frame of your DIY garden cart is a crucial step in ensuring its durability and functionality. The frame serves as the foundation that supports the entire structure, so it's essential to construct it carefully and securely. Start by selecting high-quality wood that is sturdy and able to withstand the weight of the cart and the produce it will carry. Consider the dimensions of the frame based on the size of the cart bed and the overall design plan.
Measure and cut the wood pieces according to your design specifications, ensuring precise angles and lengths for a seamless assembly. Use a drill and screws to join the frame components together, creating a strong and stable structure. Reinforce the corners and joints to prevent wobbling or instability when the cart is in use.
When building the frame, think about the weight distribution and balance of the cart to ensure smooth movement and easy handling. A well-constructed frame will provide the necessary support for the cart bed and wheels, allowing for efficient transportation of harvested produce around your garden.

Adding Wheels and Axle
When it comes to adding wheels and an axle to your DIY garden cart, precision and durability are key. The wheels are the foundation of your cart's mobility, allowing you to navigate through your garden effortlessly. Choose wheels that are sturdy and suitable for various terrains, ensuring they can withstand the weight of your harvested produce without compromising on smooth movement.
Securely attach the wheels to the frame of the cart, making sure they are evenly aligned for balanced movement. The axle plays a crucial role in connecting the wheels and ensuring they rotate smoothly. Properly installing the axle will prevent wobbling or misalignment, providing stability and ease of maneuverability as you transport your harvest.
Consider the size and type of wheels based on the terrain of your garden. If you have uneven or rough ground, opt for larger wheels with deep treads to handle bumps and obstacles effectively. This choice will enhance the cart's performance and longevity, making it a reliable companion during your gardening tasks.

Constructing the Cart Bed
When it comes to constructing the cart bed for your DIY garden cart, you want to ensure that it is not only spacious but also durable enough to withstand the weight of your harvested produce. The cart bed serves as the foundation of your cart, providing a secure space to transport your fruits and vegetables from the garden to your home.
Start by selecting high-quality wood panels that are sturdy and capable of holding a significant amount of weight. Consider the dimensions of your garden cart and customize the size and depth of the cart bed accordingly. Remember, the goal is to create a bed that can accommodate your harvest without compromising on stability.
One important aspect to consider during the construction process is the reinforcement of the cart bed. Adding additional support beams or braces underneath the bed can prevent sagging and ensure the longevity of your garden cart. A well-constructed cart bed will not only enhance the functionality of your cart but also contribute to its overall durability.
Furthermore, you may want to incorporate drainage holes in the cart bed to prevent water accumulation, especially if you will be transporting freshly harvested produce. Proper drainage will help maintain the quality of your fruits and vegetables during transit and storage.
Once the cart bed is securely in place within the frame of your garden cart, take the time to sand down any rough edges and apply a protective coat of paint. This finishing touch not only adds a polished look to your DIY creation but also helps protect the wood from moisture and other outdoor elements, extending the lifespan of your garden cart.

Installing Handles and Brakes
When it comes to on your DIY garden cart, you are adding crucial features that enhance both usability and safety. The handles will allow you to push or pull the cart with ease, making it effortless to transport your harvested produce from the garden to your desired location. On the other hand, brakes are essential for securing the cart in place, preventing it from rolling away on uneven terrain or slopes.
To install handles, you can opt for pre-made handles available at hardware stores or create custom handles using sturdy materials like metal or durable wood. Position the handles at a comfortable height and distance apart to ensure ergonomic use. Secure them firmly to the frame of the cart using screws or bolts, ensuring they can withstand the weight of the cart and the produce it carries.
When it comes to brakes, consider using wheel chocks or a braking system that can be engaged to prevent the cart from moving unintentionally. Wheel chocks are simple devices placed in front of or behind the wheels to prevent them from rolling. Alternatively, you can install a braking mechanism that allows you to lock the wheels in place when needed, providing additional stability and safety during use.
By incorporating handles and brakes into your garden cart design, you are not only improving its functionality but also ensuring a smoother and safer harvesting experience. These features will give you better control over the cart, making it easier to navigate through your garden and secure it in place when stationary.

Applying Finishing Touches
When it comes to applying finishing touches to your DIY garden cart, it's essential to focus on both functionality and aesthetics. After all the hard work you've put into constructing the cart, these final touches will not only protect your creation from the elements but also give it a polished and professional look.
One crucial step in finishing your garden cart is sanding. Smooth out any rough edges or surfaces to prevent splinters and ensure a comfortable user experience. Sanding also prepares the wood for painting or staining, creating a clean and even surface for a professional finish.
After sanding, consider painting or staining the garden cart to enhance its appearance and durability. Choose a high-quality outdoor paint or wood stain that can withstand weather exposure and provide long-lasting protection. Opt for colors that complement your garden aesthetic or add a pop of personality to your cart.
Adding a protective finish, such as a clear sealant or varnish, can further safeguard the wood from moisture, UV rays, and general wear and tear. This final coat not only enhances the cart's longevity but also adds a glossy sheen that elevates its overall look.
Personalizing your garden cart with accessories or decorative elements is another way to add a unique touch. Consider attaching hooks for hanging gardening tools, a cup holder for refreshments, or a small basket for collecting harvested produce. These details not only enhance the cart's functionality but also showcase your creativity.
Lastly, don't forget about maintenance. Regularly inspect your garden cart for any signs of damage or wear, and touch up the finish as needed to keep it looking its best. Proper care and attention to detail will ensure that your DIY garden cart remains a reliable and attractive companion for all your harvesting needs.

Testing and Using the Cart
Testing and using the garden cart is a crucial step to ensure its stability and functionality. Before loading it with harvested produce, take it for a test drive around your garden to check for any wobbling or uneven movement. Make sure the wheels are securely attached and roll smoothly on different surfaces. Remember, a well-built garden cart should glide effortlessly, making your harvesting tasks a breeze.
If you encounter any issues during the testing phase, assess the problem and make necessary adjustments to the cart. It could be a simple fix such as tightening screws or realigning the wheels. Don't hesitate to troubleshoot and refine the cart to guarantee optimal performance.
Once you are satisfied with the cart's performance, start using it during your gardening activities. Load it with freshly picked fruits and vegetables, feeling the satisfaction of a successful harvest. The spacious cart bed should accommodate a significant amount of produce, reducing the number of trips back and forth in the garden.
As you push or pull the cart through the garden paths, appreciate the convenience it brings to your harvesting routine. The handles provide a comfortable grip, allowing you to maneuver the cart with ease. When needed, engage the brakes to secure the cart in place, preventing any accidental movement.
With the garden cart by your side, harvesting becomes a more efficient and enjoyable task. Say goodbye to carrying heavy baskets or making multiple trips to transport your crops. Embrace the simplicity and practicality of your DIY creation, tailored to meet your gardening needs.
Frequently Asked Questions
- What tools do I need to build a DIY garden cart?
To build a DIY garden cart, you will need essential tools such as a drill, screws, measuring tape, saw, and hammer. These tools are necessary for constructing the frame, attaching wheels, and adding finishing touches to your garden cart.
- Can I customize the size of the garden cart bed?
Yes, you can customize the size of the cart bed based on your gardening needs and the amount of produce you typically harvest. Adjust the dimensions of the wood panels to create a spacious and functional cart bed that suits your requirements.
- How do I ensure the garden cart is stable and durable?
To ensure stability and durability, pay attention to the quality of materials used and the construction process. Use sturdy wood for the frame and cart bed, secure the wheels and axle properly, and apply a protective finish to shield the cart from outdoor elements.
- What type of wheels should I use for the garden cart?
Choose wheels that are durable and suitable for various terrains to ensure smooth movement in the garden. Consider using pneumatic wheels for better shock absorption or solid rubber wheels for low maintenance and durability.
- Do I need any special skills to build a DIY garden cart?
While basic woodworking skills are helpful, you do not need advanced expertise to build a DIY garden cart. Follow the design plan and step-by-step instructions carefully, and take your time to ensure accurate measurements and assembly for a successful project.