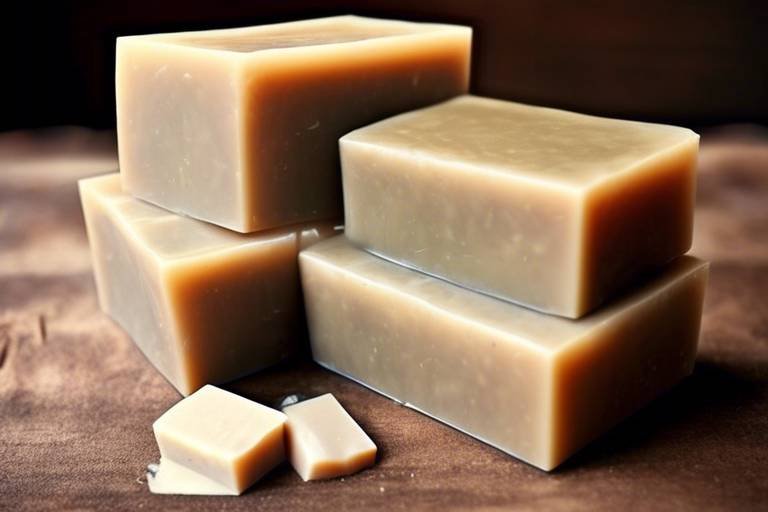
How to Make Your Own Homemade Soap
Creating your own homemade soap can be a rewarding and enjoyable experience, allowing you to customize your soap bars to suit your preferences and skin needs. By using natural ingredients and following a few simple steps, you can craft unique soaps that are both gentle on the skin and environmentally friendly.
When embarking on the journey of making homemade soap, the first step is to gather all the necessary ingredients and supplies. Essential components such as oils, lye, water, and fragrances are required for successful soap making. It's crucial to prioritize safety measures and ensure you have the proper equipment to handle these ingredients effectively.
One of the key decisions in soap making is choosing the right oils. Different oils have unique properties that can impact the texture, lather, and moisturizing capabilities of the soap. Understanding how each oil contributes to the final product allows you to tailor your soap to meet your specific needs.
As you delve into the soap making process, you will witness a chemical reaction unfold as oils, lye, and water combine to create soap. Following a detailed guide will take you through each step, from measuring ingredients accurately to molding the soap and allowing it to cure properly.
Adding colors and scents to your homemade soap can elevate the sensory experience. Natural colorants and essential oils offer a range of vibrant hues and appealing fragrances to choose from. Experimenting with different combinations allows you to create visually stunning and aromatic bars that reflect your personal style.
Customizing soap shapes and designs adds a creative touch to your creations. By exploring various molding techniques, patterns, and textures, you can craft unique and personalized soap bars that make delightful gifts or additions to your own skincare routine.
For those looking to take their soap making skills to the next level, mastering the cold process method offers greater creativity and control over the final product. This technique allows for a deeper understanding of the ingredients used and the design possibilities for your soap bars.
Alternatively, melt and pour soap making provides a simpler approach, ideal for beginners or those seeking quick results. With various additives and techniques to explore, this method offers a fun and customizable way to create your own soap bars without the need for extensive preparation.
To ensure a successful soap making experience, it's essential to be aware of common mistakes that can occur during the process. By identifying and troubleshooting issues such as lye heaviness, fragrance fading, or improper curing, you can enhance your skills and avoid setbacks in your soap making journey.

Gathering Ingredients and Supplies
Learn the step-by-step process of creating personalized soap at home using natural ingredients. Discover the satisfaction of crafting your own unique soap bars tailored to your preferences and skin type.
When it comes to making your own homemade soap, gathering the right ingredients and supplies is crucial for a successful crafting experience. You will need a variety of components such as oils, lye, water, and fragrances to create your personalized soap bars. It's essential to prioritize safety measures and ensure you have the proper equipment before starting the soap making process.
Before diving into the world of soap making, take the time to familiarize yourself with the properties of each ingredient. Understanding how oils, lye, and water interact is key to producing high-quality soap. Additionally, choosing the right fragrances can elevate your soap bars, creating a delightful sensory experience.
Creating a designated workspace for your soap making endeavors is also essential. Make sure you have a well-ventilated area with access to water and proper lighting. Organizing your ingredients and tools beforehand will streamline the soap making process and prevent any last-minute mishaps.
Consider investing in quality molds and containers to shape and store your soap bars effectively. Having a variety of molds allows you to experiment with different shapes and designs, adding a creative touch to your homemade soaps. Remember, the quality of your ingredients and supplies will directly impact the final outcome of your soap bars.
Overall, gathering the right ingredients and supplies sets the foundation for a successful soap making journey. By prioritizing safety, understanding ingredient properties, and organizing your workspace, you are ready to embark on a rewarding and fulfilling soap crafting experience.

Choosing the Right Oils
When it comes to making homemade soap, selecting the right oils is crucial for achieving the desired properties in your soap bars. Different oils bring unique characteristics to the soap, influencing factors such as lather, moisturization, and hardness. Let's explore some common oils used in soap making:
1. Coconut Oil: Coconut oil is popular in soap making due to its ability to produce a rich lather and add hardness to the soap. It is excellent for cleansing but can be drying in high concentrations.
2. Olive Oil: Olive oil provides moisturizing properties to the soap and creates a gentle, creamy lather. It is a staple in many soap recipes for its conditioning effects.
3. Shea Butter: Shea butter is known for its nourishing and emollient properties, making it a great choice for adding extra moisture to the skin through the soap.
4. Avocado Oil: Avocado oil is rich in vitamins and minerals, offering hydrating and conditioning benefits to the soap. It contributes to a creamy lather and adds a luxurious feel to the soap.
When choosing oils for your homemade soap, consider the desired outcome and the properties each oil brings to the formula. Experimenting with different oil combinations can help you create a soap that suits your skin type and preferences.

Understanding the Soap Making Process
When it comes to understanding the soap making process, it's essential to grasp the intricate chemical reactions that take place to transform simple ingredients into luxurious soap bars. The foundation of soap making lies in the combination of oils, lye, and water, which undergo a fascinating transformation through saponification. This process involves the alkaline lye reacting with the fatty acids in oils to create soap, glycerin, and heat as byproducts.
Measuring the ingredients accurately is crucial to ensure the right balance for a successful soap batch. Each type of oil brings its unique properties to the mix, influencing the soap's texture, lather, and moisturizing abilities. Understanding how these oils interact with lye and water is key to creating a well-balanced soap that suits your skin type and preferences.
Once the oils, lye, and water are combined, the soap mixture needs to be stirred until it reaches trace, a point where the ingredients have emulsified, leaving a trace or trail when drizzled over the surface. This is a critical stage in the soap making process, indicating that saponification is occurring and the soap is beginning to form.
After reaching trace, the soap can be customized with colors, scents, and additives to enhance its visual appeal and fragrance. Natural colorants like clays, herbs, and spices can be used to achieve a spectrum of hues, while essential oils provide a wide range of scents for a personalized touch. These additions not only add aesthetic value but also contribute to the overall sensory experience of using the soap.
Once the soap mixture is thoroughly blended and customized, it is poured into molds to shape and set. The curing process follows, allowing the soap to harden and mature over several weeks. During this time, the soap undergoes further chemical changes, becoming milder, harder, and longer-lasting, ready to be used and enjoyed.

Adding Colors and Scents
Adding colors and scents to your homemade soap is a fun and creative process that allows you to personalize your bars with vibrant hues and captivating fragrances. Natural colorants and essential oils are key ingredients in enhancing the visual appeal and aromatic experience of your soap creations. By experimenting with different combinations, you can craft unique and visually stunning bars that not only look beautiful but also smell amazing.
When it comes to adding colors to your soap, natural colorants such as clays, herbs, and botanicals are popular choices. These ingredients not only provide a range of colors but also offer additional benefits for the skin. For example, French green clay can impart a lovely green hue to your soap while providing gentle exfoliation. Similarly, using spirulina powder can create a vibrant blue color while offering antioxidant properties.
Essential oils are essential for adding scents to your homemade soap. These concentrated plant extracts not only provide delightful fragrances but also offer various therapeutic benefits. For instance, lavender essential oil can promote relaxation and calmness, making it a popular choice for bedtime soaps. On the other hand, citrus essential oils like lemon or orange can uplift the mood and provide a refreshing scent.
Combining colors and scents in your soap making process allows you to create a multisensory experience for yourself and your loved ones. Whether you prefer soothing lavender-scented bars or invigorating citrus-colored soaps, the possibilities are endless when it comes to customizing your homemade creations. Get creative with your color and scent combinations to craft unique and personalized soap bars that cater to your preferences and mood.

Customizing Soap Shapes and Designs
When it comes to customizing soap shapes and designs, the possibilities are endless. You can unleash your creativity and make soap bars that are not only luxurious for your skin but also visually stunning. One way to customize your soap is by using different molds. Whether you prefer classic rectangular bars, intricate patterns, or fun shapes like hearts or stars, there are molds available to suit every preference.
Experimenting with textures is another exciting way to personalize your soap. You can create soaps with smooth surfaces, textured tops, or even embedments like flower petals or exfoliating seeds for added visual interest and skin benefits. By playing with different textures, you can elevate your soap-making experience to a whole new level.
Consider using layers and swirls to add a dynamic touch to your soap designs. Layering different colored soap batters or swirling them together can result in beautiful, marbled patterns that are both eye-catching and unique. This technique allows you to create soap bars that resemble pieces of art, making them perfect for gifting or displaying in your bathroom.
Furthermore, don't forget about adding embellishments to your soap creations. From dried herbs and botanicals to glitter and mica powders, there are endless options for enhancing the visual appeal of your soaps. These decorative elements not only make your soaps look more attractive but also provide additional benefits such as exfoliation or aromatherapy.
Lastly, customizing soap shapes and designs is a fantastic way to express your personality and style. Whether you prefer elegant and sophisticated designs or playful and whimsical shapes, the choice is yours. By experimenting with different techniques and ingredients, you can create soap bars that are truly one-of-a-kind and reflect your individuality.

Mastering Cold Process Soap Making
Learn the step-by-step process of creating personalized soap at home using natural ingredients. Discover the satisfaction of crafting your own unique soap bars tailored to your preferences and skin type.
Explore the essential components needed to make homemade soap, including oils, lye, water, and fragrances. Understand the importance of safety measures and proper equipment for successful soap making.
Delve into the various types of oils used in soap making and their unique properties. Learn how different oils affect the soap's texture, lather, and moisturizing capabilities for a customized product.
Discover the chemical reaction that occurs when combining oils, lye, and water to create soap. Follow a detailed guide on the soap making steps, from measuring ingredients to molding and curing.
Learn how to incorporate natural colorants and essential oils into your homemade soap for vibrant hues and appealing fragrances. Experiment with different combinations to create visually stunning and aromatic bars.
Get creative with molding techniques and designs to make visually appealing soap bars. Explore various molds, patterns, and textures to craft unique and personalized soaps for yourself or as gifts.
Dive into the cold process method of soap making, a popular technique that allows for more creativity and control over the soap's ingredients and design. Learn the ins and outs of cold process soap making.
Discover the simplicity of melt and pour soap making, ideal for beginners or those looking for a quick and easy soap crafting method. Explore different additives and techniques for fun and customizable results.
Identify common pitfalls in homemade soap making and learn how to troubleshoot issues such as lye heaviness, fragrance fading, or improper curing. Enhance your soap making skills by understanding and avoiding mistakes.
Stay tuned for the FAQ section!

Exploring Melt and Pour Soap Making
When it comes to soap making, one of the most accessible methods for beginners is the melt and pour technique. This process involves melting a pre-made soap base, adding your desired ingredients, and pouring it into molds to set. It's like a blank canvas waiting for your creative touch. Melt and pour soap making is perfect for those who want to skip the complexities of handling lye and focus on the fun part – experimenting with colors, scents, and additives.
With melt and pour soap making, you have the freedom to customize your soap bars with a wide range of additives such as essential oils, herbs, exfoliants, and colorants. This method allows you to create unique combinations that suit your preferences and skin needs. Whether you want a soothing lavender-scented soap or a vibrant citrus-colored bar, the possibilities are endless with melt and pour soap making.
One of the key advantages of melt and pour soap making is its simplicity and quick turnaround time. Unlike cold process soap making that requires curing time, melt and pour soaps can be used almost immediately after they harden. This makes it an ideal choice for those who want instant gratification and enjoy the instant results of their crafting efforts.
Another benefit of melt and pour soap making is the ease of incorporating decorative elements into your soap bars. From embedding small toys or flower petals to creating intricate layers and designs, this method allows you to unleash your creativity and produce visually stunning soaps. Whether you're making gifts for loved ones or simply indulging in a creative hobby, melt and pour soap making offers endless possibilities for artistic expression.

Avoiding Common Soap Making Mistakes
When it comes to making homemade soap, avoiding common mistakes is crucial to ensure the success of your crafting endeavors. One of the most common errors in soap making is not accurately measuring ingredients. Precision is key in soap making, as even a small deviation can lead to undesirable results. Additionally, failing to properly mix the oils, lye, and water can result in an incomplete saponification process, leading to a poorly formed soap.
Another mistake to steer clear of is using incorrect temperatures during the soap making process. Both oils and lye need to be at the right temperature for successful soap making. Failure to adhere to temperature guidelines can lead to issues such as separation, accelerated trace, or a failed batch of soap.
Furthermore, overlooking the importance of safety precautions when working with lye is a significant mistake. Lye is a caustic substance that requires careful handling to prevent accidents. Always wear protective gear, work in a well-ventilated area, and keep vinegar or citric acid on hand to neutralize lye spills.
One common pitfall in soap making is rushing the curing process. Curing allows the soap to harden and improve its quality over time. Skipping or shortening the curing period can result in soft, mushy soap that doesn't lather well or lasts as long as properly cured soap.
Lastly, neglecting to test your soap for pH levels before use can lead to skin irritation or other adverse reactions. Testing the pH ensures that the soap is safe and gentle on the skin. Use pH testing strips to check the acidity of your soap and make any necessary adjustments for a skin-friendly product.
Frequently Asked Questions
- Can I use any type of oil to make homemade soap?
While certain oils are more commonly used in soap making due to their properties, you can experiment with different oils to create unique soap blends. It's essential to understand how each oil affects the final product's texture and moisturizing qualities.
- Is homemade soap safe to use on sensitive skin?
Homemade soap can be gentle on sensitive skin, especially when crafted using natural ingredients. However, it's crucial to perform a patch test before using the soap regularly to ensure no adverse reactions occur.
- Do I need special equipment to make homemade soap?
While some equipment is necessary for safe soap making, such as a scale, thermometer, and safety gear, you can find many of these items in your kitchen or purchase them from craft stores. Ensuring you have the right tools will help you create soap effectively and safely.
- How long does it take for homemade soap to cure?
The curing time for homemade soap can vary depending on the ingredients used and the desired hardness of the final product. Typically, cold process soap may need 4-6 weeks to cure, while melt and pour soap can be used almost immediately after cooling and hardening.
- Can I add exfoliants to homemade soap?
Absolutely! Adding exfoliants like oatmeal, coffee grounds, or poppy seeds can enhance the soap's texture and provide gentle exfoliation. Be sure to consider the size and texture of the exfoliants to ensure they are suitable for the skin.